RC Boats
Each year millionds of pounts of trash enter the earth’s oceans and now there is something you can do about it! Start developing cleanup solutions today by creating an RC boat that can assist in the global oceans cleanup. This project is designed for those who are only attending Fall 2019.
This project is purposefully left open-ended. This page explains the basics of building a boat, but please be creative! This project was designed to explain some of the basics of developing with Arduino, but still allows room for innovation!
Electronics:
The electronic components you will need are as follows:
- 1 Arduino board
- 1 DC motor
- 1 Servo motor
- 1 LD293 H-Bridge
- 1 Power-supply module
- 1 Breadboard or prototyping board
- 1 H050 Bluetooth module
- 4 LED’s of assorted colors (optional)
- Multicolored jumper wires
- Batteries or a wall cable
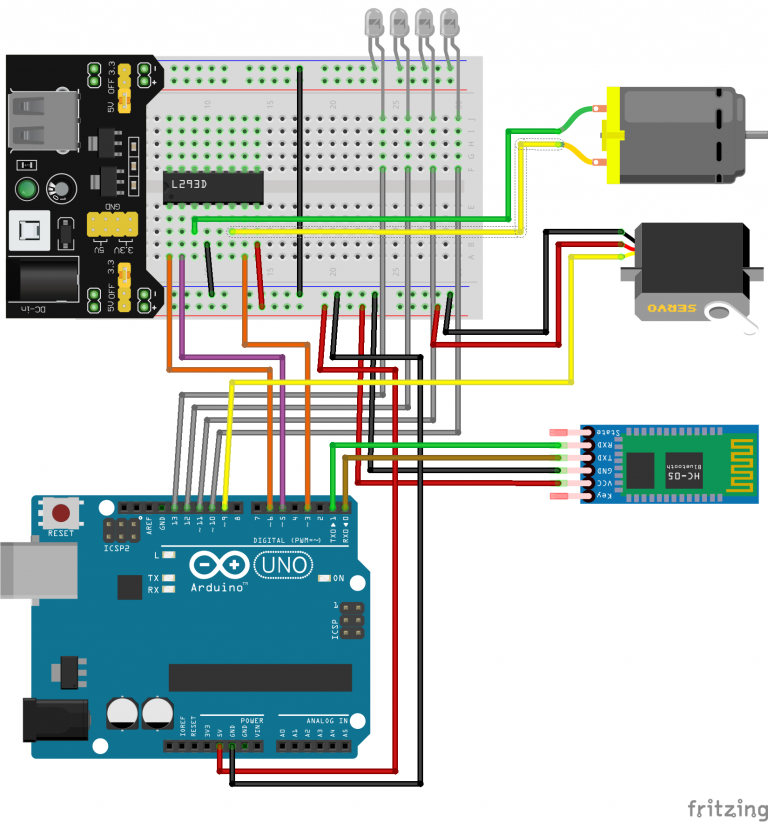
First, assemble the components according to the schematic below. The grey LED’s and wires are optional, the second schematic shows the layout of components without those.


Helpful tips:
- The bottom jumper on the power supply module must be on the bottom two pin (the ones that say 5V). This means that the bottom two rows supply 5V of power, which is what all the components need. The top jumper can be connected to the center pins, OFF.
- The dot on the LD293 is on the bottom left corner when viewed from above. Make sure to get this right, if it is the wrong way the component won’t work!
- The Arduino Pins 0 and 1 are labeled RXD and TXD, respectively. The Bluetooth also has pins labeled RXD and TXD. Make connect the pins so that RXD on the Bluetooth goes to TXD on the board, and vice-versa.
- The batteries must be connected to the jack on the power supply module, not the Arduino board.
Code:
The boat code is available on GitHub! The link to the repository is here. Or you can use the command shown below in the terminal to clone the code directly to your machine.
